
12 Essential Techniques for Customizing Your Photoshop Brushes in Digital Illustration
Hi, this is Esther Nariyoshi, a working illustrator who lives in the US. Adobe Photoshop has been one workhorse in my daily practice. I have loved brushes from incredible brush makers in the past, and as I grow in my artistic expression, I often find myself in need of making brushes that fit my own style. In this comprehensive blog post, I will cover 12 essential settings that you will find helpful in making those Photoshop Brushes work for you.
Reminder: If you fine tune your brush settings, remember to save your favorite brush presets, because Adobe Photoshop automatically resets as soon as you click out of that brush.

12 Essential Techniques for Customizing Your Photoshop Brushes in Digital Illustration
First, press B to select the Brush Tool
When a brush tool is selected/activated in Adobe Photoshop
You will also need the Brushes and Brush Settings Windows to select and make adjustments to brushes
They can be found under Window > Brushes or Brush Settings

Where to find Brushes and Brush Settings Panels in Adobe Photoshop
1. Adjusting Brush Size and Hardness:
Size: Press
[to decrease and]to increase the brush size. This controls the area your brush affects with each stroke.Hardness: Right-click (or Opt Click on Mac) on the canvas and move the hardness slider. A softer brush creates more blended edges, ideal for smooth transitions and shadows.
Note: the hardness slider is not available to all brushes.

Adjusting Brush Size and Hardness in Adobe Photoshop
2. Modifying Opacity:

After brush tool is selected (Press B) You can find the Opacity, Flow and Smoothing sliders at the top

Comparing Brush Opacity in Adobe Photoshop
Usage: Find the opacity slider in the options bar. Lowering opacity makes the brush strokes more transparent, allowing underlying layers or colors to show through.
Application: Great for building up colors and shadows gradually, or for softening the impact of a brush stroke.
3. Altering Flow:

Comparing different flow settings in Adobe Photoshop
Flow vs Opacity: Flow controls the rate at which color is applied. Unlike opacity, it builds up more color with each stroke over the same area.
Technique: Use a lower flow for more control over the gradual build-up of color, especially for shading and texturing.
4. Smoothing:

Comparing different smoothing settings in Adobe Photoshop
Purpose: Make lines appear more smooth
Technique: Increasing smoothing percentage will make your lines look more silky and less bumpy, the downside is that the smoothing will also slow down your computer. Expect some lag if the smoothing level is high.
5. Changing Brush Tip Shape:

Changing Brush Tip Shape in Brush Settings Panel in Adobe Photoshop
Shape Dynamics: Accessible under
Brush Settings, where you can modify aspects like diameter, angle, and spacing.Effect: Altering these settings changes the stroke's behavior, offering different effects for varied artistic styles. I draw, paint and scan in my own brush tip shapes in order to make unique marks and brushes
6. Customizing Shape Dynamics:
Jitters: Adjust the size jitter for variable stroke widths, angle jitter for rotation, and roundness jitter for the brush's elliptical shape.
Illustration Use: Ideal for creating natural-looking variations in your strokes, mimicking traditional media.

Changing Brush Size Jitter Settings in Adobe Photoshop

Size Jitter setting in Brush Settings Panel in Adobe Photoshop
7. Utilizing Scattering:
Scatter Setting: Increases the dispersion of brush marks.
Effect: Creates a more random, organic feel, perfect for textures like grass, hair, or abstract backgrounds.

Changing Scattering Settings in Adobe Photoshop

Scatter Slider in Brush Settings Panel in Adobe Illustrator
8. Applying Textures:
Texture Integration: Add a texture to your brush for depth. You can choose from Photoshop's default textures or use your own.
Creative Use: Textured brushes add a tactile feel to digital artwork, enhancing realism or artistic flair.

Finding Texture settings in Brush Settings Panel in Adobe Photoshop

Finding Texture settings in Brush Settings Panel in Adobe Photoshop
9. Dual Brush Effects:
Combination: Merging two brush tips can create complex effects.
Application: Useful for adding variety to a single stroke, such as mixing a basic brush with a textured one for depth.

Where to find Dual Brush Setting in Adobe Photoshop

One example of a brush with Dual Brush setting turned on
10. Adjusting Transfer Settings:
Dynamic Painting: Opacity jitter and flow jitter under ‘Transfer’ add dynamic variation to each stroke.
Technique: These settings are great for simulating the variable opacity of real-world painting techniques.
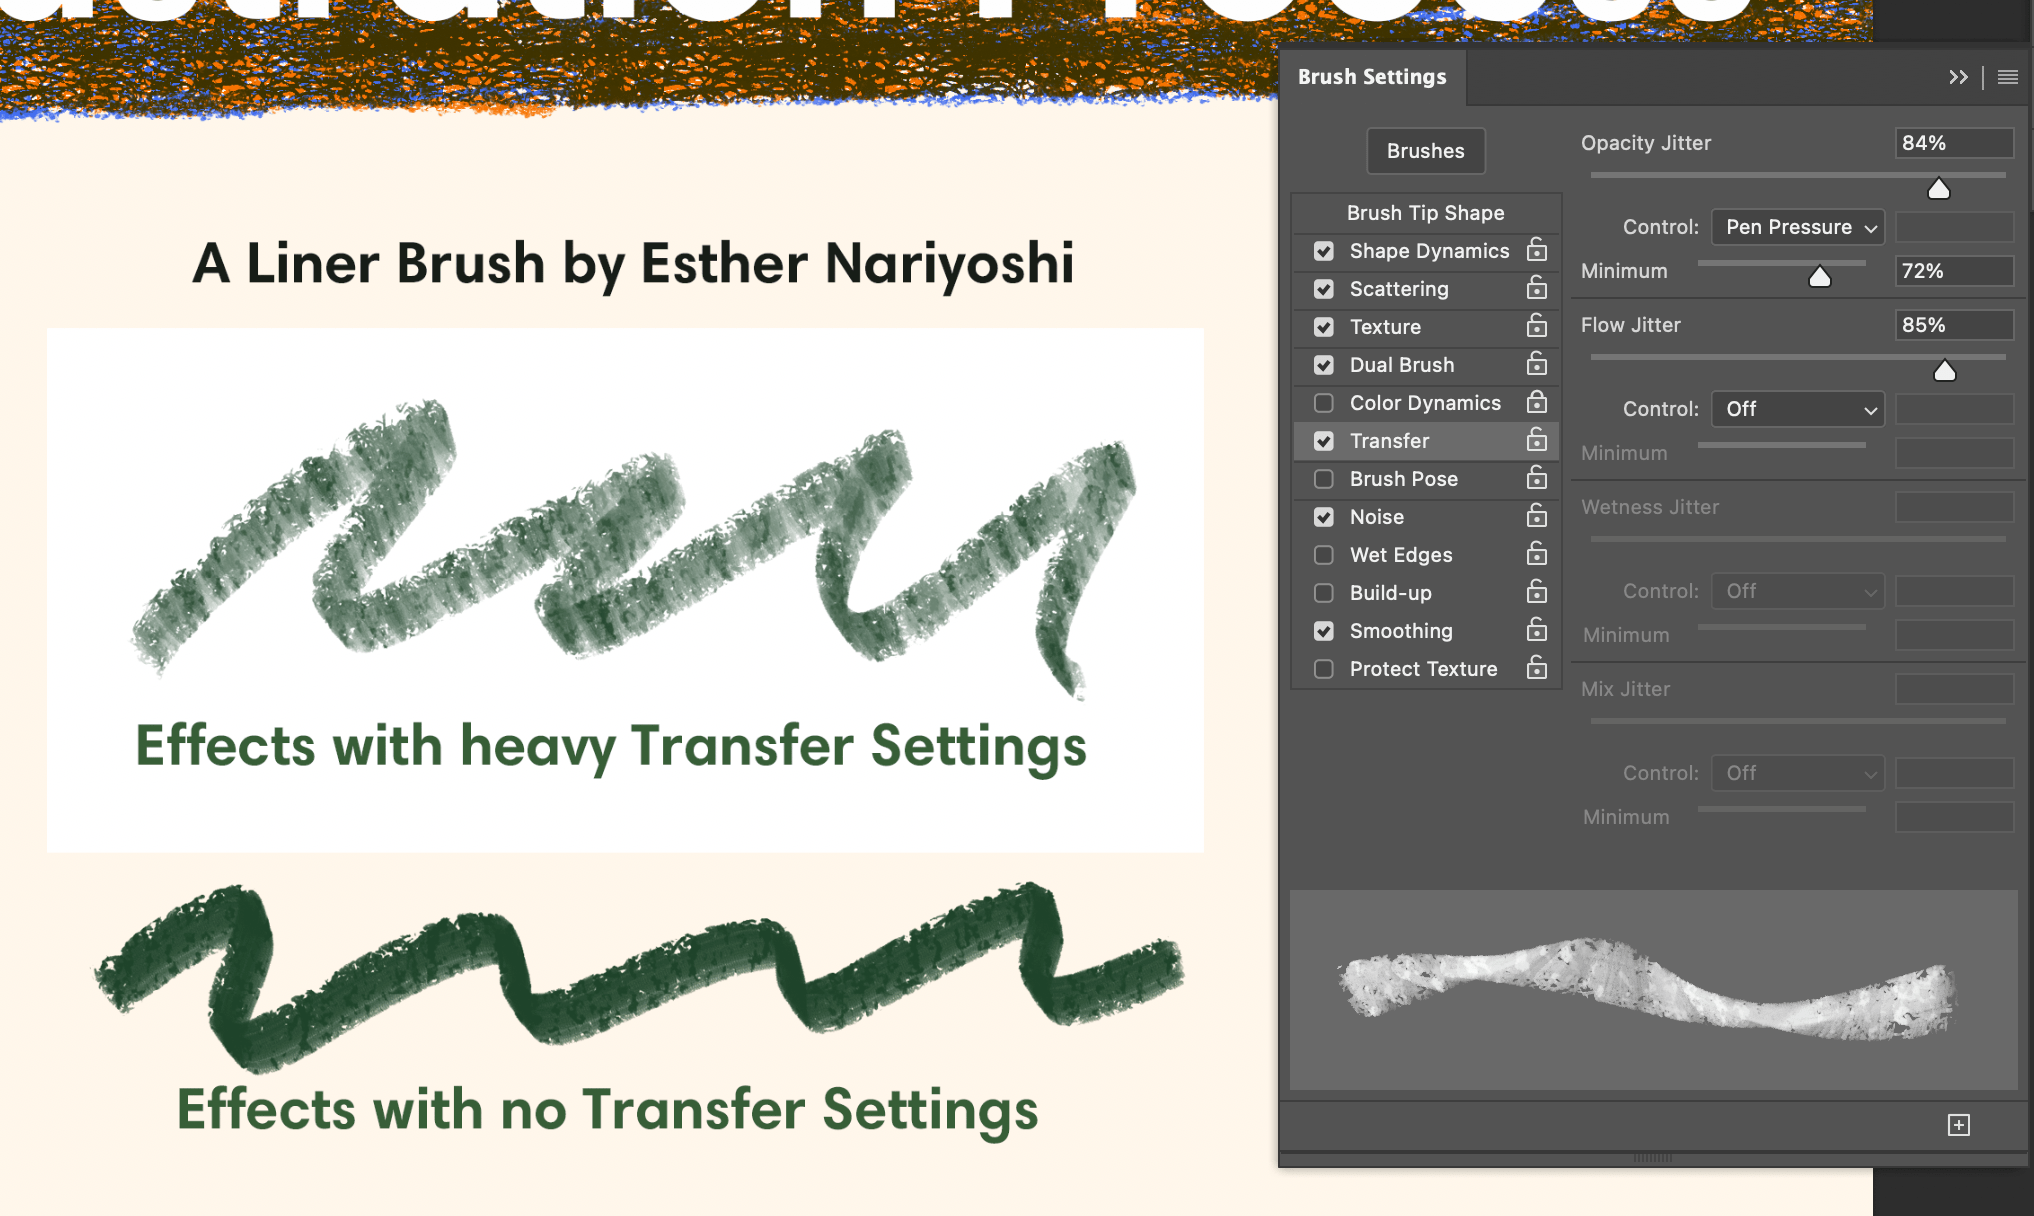
Transfer Settings in Adobe Photoshop
11. Wet Edges for Watercolor Effects:
Edge Accumulation: Wet edges accumulate paint at the edges of the stroke, similar to watercolor.
Use Case: Perfect for creating soft, watercolor-like effects in digital paintings.
Wet edges effect in adobe Photoshop

Wet edges effect in adobe Photoshop
12. Implementing Color Dynamics:
This is hands down my favorite way to modify brushes. Just a tiny percentage change can alter the whole look and feel of the brushes.
Color Variation: Adjust foreground/background jitter for automatic color changes during a stroke.
Artistic Effect: Ideal for adding vibrancy and unpredictability to strokes, simulating natural media's color variations

Where to find Color Dynamics settings in Brush settings in adobe Photoshop
Brush customization in Photoshop is a powerful way to infuse your digital art with personality and style. Each tweak and adjustment opens up new artistic possibilities, allowing you to craft brushes that perfectly suit your vision.
Enhance your brush library further with the "Photoshop Essential Digital Brush Collection" available at Esther Nariyoshi's Shop, where you can find a range of high-quality, versatile brushes for Procreate App and Adobe Photoshop to kickstart your creative journey.

About Esther Nariyoshi
Hi, I am an illustrator who loves exploring both traditional and digital mediums. I've had the joy of collaborating with some wonderful folks, like Cloud9 Fabrics, and MSU Broad Art Museum, and sharing some tidbits of my creative process through UPPERCASE Magazine. My heart finds joy in food and nature illustrations, and occasionally, I share my creative process on my YouTube Channel. If you love art or need inspiration, join me on Skillshare or YouTube tutorials.

Skip hours of sifting through generalized tutorials, and enjoy a personalized learning session with a laser focus. In a 1-on-1 session, you will receive personalized instruction on how to elevate your digital illustration to the next level based on your own artistic style and preference using Procreate, Adobe Illustrator, and Photoshop, as well as your paper sketchbook.


Premium Digital Brushes for Artists: Created by an Illustrator, for Illustrators. These expertly crafted digital brushes are designed to enhance your artistic workflow in digital illustration.

Free Procreate Brushes Free Adobe Illustrator Brushes as well as other helpful resources to get you started in digital Illustration
Next Steps

Beginner friendly classes on Adobe Illustrator